
I remember feeling unsure when I first tried synthetic leather upholstery. I soon realized that anyone can tackle this project with a bit of patience and the right guidance. I found that basic tools and affordable materials made the process stress-free. You do not need special skills to get great results. With a little effort, you can transform furniture and enjoy the satisfaction of your own handiwork.
Gather essential tools like a staple gun, scissors, and a screwdriver before starting your upholstery project.
Choose high-density foam and batting to ensure comfort and a polished look for your furniture.
Measure accurately and add extra fabric for wrapping to avoid mistakes and ensure a snug fit.
Prepare your furniture by removing old fabric, inspecting for damage, and cleaning the surface for better adhesion.
Take your time when attaching the faux leather, starting from the center and working outward to avoid wrinkles.
Use trim or piping to give your project a professional finish and hide any raw edges or staples.
Regularly clean and maintain your faux leather furniture to extend its life and keep it looking new.
Practice techniques on scrap pieces to build confidence and improve your skills before tackling the actual project.

When I started my first upholstery project, I quickly learned that having the right tools and materials made everything easier. I want to share what I found most helpful for beginners.
A staple gun is the main tool I use to attach faux leather fabric to furniture frames. Manual staple guns work well for small projects. For larger pieces, I sometimes use an electric staple gun for extra power and speed.
Sharp scissors help me cut faux leather fabric cleanly. I keep a pair just for fabric to avoid dulling the blades.
I use a screwdriver to remove hardware or legs from furniture before I start. This step makes the upholstery process smoother and helps me reach every area.
Tip: Some beginners like to use a basic sewing machine for seams or piping. Brands like Singer and Janome offer beginner-friendly machines with simple stitch adjustments and easy tension controls.
I always check the condition of the existing foam. If it feels worn out, I replace it with high density foam. This type of foam gives the seat or backrest a firm, comfortable feel and holds its shape over time.
Batting adds a soft layer between the foam and the faux leather. It smooths out any rough edges and helps the finished piece look plush.
Trim or piping gives the project a professional finish. I like to match or contrast the trim with the faux leather for a custom look.
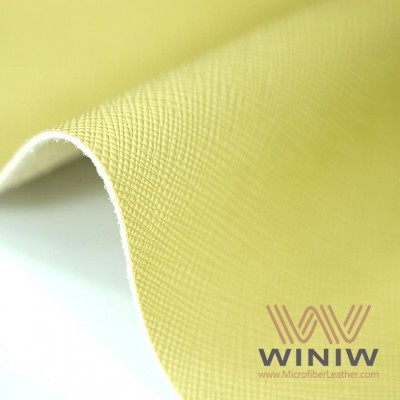
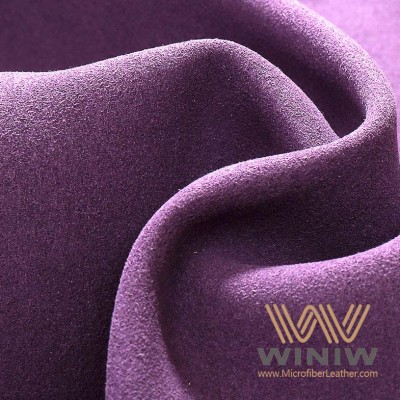
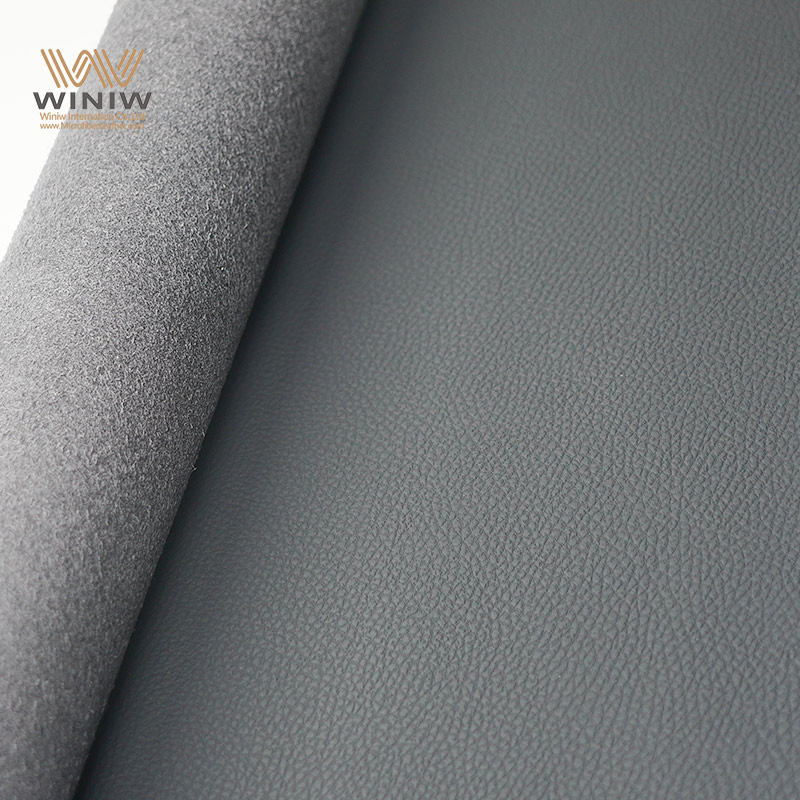
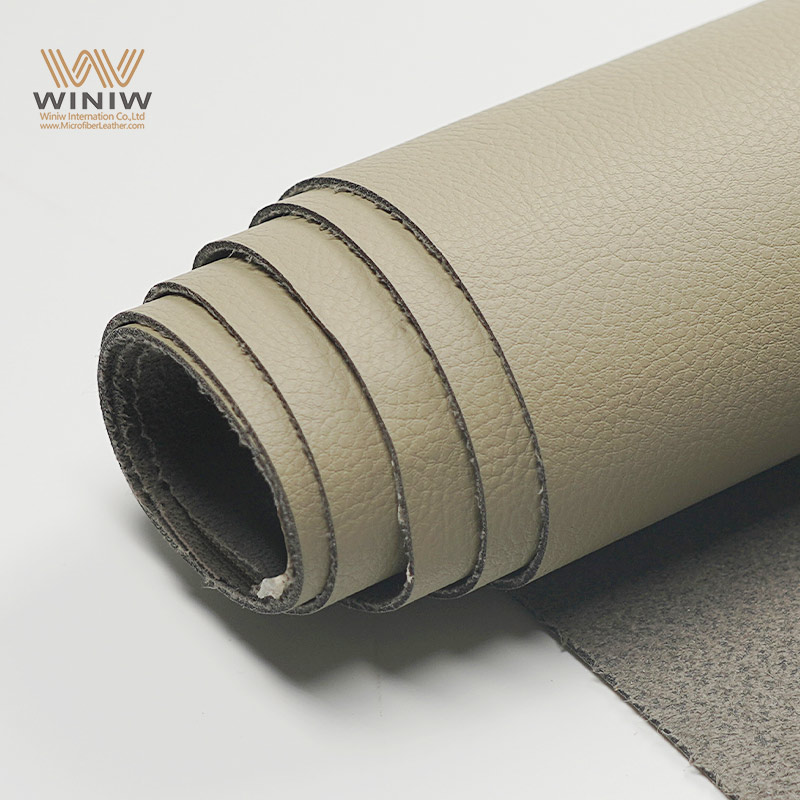
When I pick faux leather, I look for a soft, breathable surface that feels comfortable to the touch. Microfiber faux leather stands out for its durability. It resists spills, scratches, and daily wear, which makes it perfect for high-traffic furniture. Many modern faux leather options come in matte finishes that look and feel like real leather.
I often choose neutral tones like ivory, taupe, or grey. These shades blend well with most home decor and give a realistic appearance. Faux leather fabric comes in a wide range of colors, so I can always find something that matches my style. I also appreciate that faux leather is a sustainable choice, especially when I want to avoid animal-based materials.
Note: I always let my faux leather fabric sit in the room for at least 24 hours before I start. This step allows the material to acclimate to the temperature and humidity, which helps prevent wrinkles and makes it easier to work with.
I find that gathering these tools and supplies before I begin saves time and reduces stress. With the right materials, I feel confident tackling any faux upholstery project.
Before I start any upholstery project, I always make sure the furniture is ready for its transformation. This step sets the foundation for a smooth and successful process. I have learned that careful preparation saves time and prevents problems later.
I begin by removing the old fabric from the furniture. I use a flathead screwdriver or a staple remover to pry up the staples. I work slowly to avoid damaging the frame or the padding underneath. Sometimes, I find that staples hide in corners or under folds. I check every inch to make sure I do not miss any. I place the removed staples in a small container to keep my workspace tidy.
Tip: Wear gloves during this step. Old staples can be sharp and may cause injury.
As I remove the fabric, I often find screws, brackets, or decorative tacks. I save all hardware in a labeled bag or container. This habit helps me keep track of small parts. When I reassemble the furniture, I know exactly where each piece belongs. I also take photos of the disassembly process with my phone. These pictures serve as a helpful reference when I put everything back together.
Once I strip the furniture down to its frame, I take time to inspect it closely. I look for any hidden issues that could affect the final result. I check for loose joints, cracks, or broken springs. If I find any problems, I repair them before moving forward. I use wood glue for minor cracks and tighten screws or bolts as needed. I want the frame to feel sturdy and secure.
I always inspect the furniture for hidden frame or spring issues before starting any upholstery project.
I choose materials that suit the local humidity and salt air conditions, especially if the furniture will be in a coastal area.
I plan my upholstery projects during quieter times of the year to avoid unnecessary delays.
After repairs, I make sure the surface is smooth and clean. I sand down any rough spots or splinters with fine-grit sandpaper. I wipe away dust and debris with a damp cloth. A clean surface helps the new faux leather adhere better and look more polished. I also check for any old glue or staples that might stick out. Removing these ensures a flawless finish.
Note: Taking extra time to prepare the furniture pays off in the end. A solid, clean base makes the upholstery process much easier and gives the finished piece a professional look.
Measuring and cutting the faux leather is a crucial step in any upholstery project. I always take my time here because accuracy makes the rest of the process much easier. When I measure and cut carefully, I avoid wasting material and ensure a snug, professional fit.
I start by measuring each part of the furniture that needs new upholstery. I use a flexible tape measure because it wraps around curves and corners easily. I write down the length and width of every section, including the seat, backrest, and arms if needed. I double-check each measurement to avoid mistakes.
I measure the widest and longest points of each area.
I record the numbers in a notebook or on my phone.
I label each measurement so I know which piece it belongs to.
Tip: I always measure twice before I cut anything. This habit saves me from costly errors.
I learned early on that faux leather needs extra material to wrap around the edges and attach to the frame. I add at least 2 to 4 inches to each side of my measurements. This extra fabric gives me enough to pull the material tight and staple it securely.
For example, if the seat measures 20 inches by 20 inches, I cut my faux leather to at least 24 inches by 24 inches. This extra space helps me get a smooth, wrinkle-free finish.
I add more extra fabric for thick padding or deep seats.
I use a ruler or straight edge to mark the cutting lines on the back of the faux leather.
Note: It is better to have a little too much fabric than not enough. I can always trim the excess later.

Once I have my measurements and extra allowance, I lay the faux leather flat on a clean surface. I smooth out any wrinkles by hand. I use sharp scissors to cut along the lines I marked. Clean cuts make the material easier to work with and help the finished piece look neat.
I keep the scissors at a steady angle for straight lines.
I cut slowly to avoid jagged edges.
If the furniture has unusual shapes or curves, I make a paper pattern first. I trace the old fabric onto craft paper or newspaper. I cut out the pattern and lay it on the faux leather. I trace around the pattern with chalk or a fabric marker.
Tip: I label each pattern piece so I do not mix them up. This step keeps the process organized and stress-free.
Using patterns helps me avoid mistakes, especially on rounded corners or detailed areas. I find that this extra step saves time and gives me confidence before I start attaching the new material.
Upholstering furniture with synthetic leather upholstery feels rewarding when I follow a clear process. I always start by preparing my workspace and laying out all materials. I use high density foam and faux leather fabric to achieve a comfortable and stylish result. Here is how I approach each step:
I begin by placing high density foam on the seat or backrest. I make sure the foam fits snugly and covers the entire area. I add a layer of batting over the foam for extra softness. Next, I lay the faux leather fabric over the foam and batting. I smooth the material with my hands to remove any wrinkles.
I focus on the largest, flattest sections first. I pull the faux leather fabric gently so it sits flat and even. I use my staple gun to attach the fabric to the underside of the frame. I space the staples about two inches apart for a secure hold. I check that the fabric stays tight and smooth as I work across the surface.
Tip: I always start stapling in the center of each side and work outward. This method helps me keep the tension even and prevents bunching.
I pull the synthetic leather upholstery firmly as I move along each edge. I avoid stretching the material too much, which can cause tears. I keep the tension consistent so the surface looks smooth and professional. I pause often to check for wrinkles or loose spots. If I see any, I lift the fabric and adjust before adding more staples.
I repeat this process for every flat area. I make sure the faux leather covers the foam completely and sits flush against the frame. I find that working slowly and checking my progress helps me achieve the best results.
Corners and edges require extra attention during synthetic leather upholstery. I use both hands to fold the faux leather neatly around each corner. I create small pleats or tucks so the material lays flat. I avoid bulky folds that can look messy. I trim any excess faux leather fabric before folding to reduce bulk.
I use my fingers to shape the fabric and keep the folds tight. I check that the corners look smooth from every angle. I sometimes use a small amount of spray adhesive to hold the folds in place before stapling.
Note: I always test my folding technique on a scrap piece of faux leather before working on the actual project. Practice helps me get crisp, clean corners.
Once I finish folding, I secure the synthetic leather upholstery with staples. I place the staple close to the edge for a tight hold. I add extra staples in areas that experience more stress, such as corners and curves. I check that the faux leather stays in place and does not shift when I press on it.
I work my way around the entire piece, making sure every edge and corner feels secure. I use high density foam under the faux leather to maintain comfort and shape. I inspect the finished project for any loose spots or uneven edges. If I find any, I add more staples or adjust the folds.
Tip: I always keep a small hammer nearby to tap down any raised staples. This step ensures a smooth, safe finish.
I find that patience and attention to detail make synthetic leather upholstery easier for beginners. Using quality foam and faux materials helps me achieve a comfortable and attractive result. I enjoy seeing my project come together as I work through each step.
After I attach the synthetic leather, I always focus on the finishing touches. These steps make the difference between a project that looks homemade and one that looks professional. I take my time here because the details matter.
Once I secure the faux leather, I check for any extra material hanging over the edges. I use sharp scissors to trim away the excess. I cut close to the staples but leave a small margin. This margin helps prevent the fabric from pulling loose over time.
I pay special attention to the edges. I want them to look clean and even. I run my fingers along the edge to feel for any bumps or uneven spots. If I find any, I trim them carefully. Sometimes, I use a utility knife for tight corners. I always cut away from my body for safety.
Tip: I keep a small trash bag nearby for scraps. This keeps my workspace tidy and makes cleanup easier.
Adding trim or piping gives the furniture a polished look. I choose a trim that matches or contrasts with the faux leather. I measure the length I need by wrapping the trim around the edge of the seat or backrest. I cut the trim to size before attaching it.
I attach the trim using a hot glue gun or small upholstery tacks. I press the trim firmly into place, making sure it covers the staples and raw edges. For piping, I tuck it into the seam and staple it down as I go. I check that the trim sits straight and smooth all the way around.
I use decorative nailhead trim for a classic look.
I pick bold piping colors for a modern style.
I always test a small section first to see how the trim looks with the faux leather.
Note: Trim not only hides staples but also protects the edges from wear.
When the upholstery looks finished, I gather the hardware I removed earlier. I use my screwdriver to reattach legs, handles, or brackets. I refer to the photos I took during disassembly to make sure everything goes back in the right place.
I tighten all screws and check that the furniture feels sturdy. I give the piece a gentle shake to test its stability. If anything feels loose, I fix it before moving on.
I always take a moment to admire my work at this stage. The finishing touches make the project feel complete and professional.
I have learned that measuring mistakes can ruin an upholstery project before it even begins. When I first started, I sometimes rushed through this step. I ended up with fabric that was either too small or wasted too much material. Now, I always double-check my measurements. I use a flexible tape measure and record each number clearly. I make sure to measure the widest and longest points of every section. I also add extra inches for wrapping around the edges. If I skip this, the fabric might not reach the frame, or I might not have enough to pull tight. I label each measurement so I do not mix up the seat, backrest, or arms. Careful measuring saves time and money. It also helps me avoid frustration later in the process.
Tip: I always measure twice and cut once. This habit helps me catch mistakes before they become costly.
Loose material can make even the best-looking upholstery job appear sloppy. I have seen this happen when the fabric does not fit snugly or when I do not pull it tight enough during installation. Several factors can cause loose material:
Smooth or slippery fabrics, such as satin or polyester, do not grip well and tend to slip.
Covers that are too large fail to conform to the furniture’s shape, which causes shifting and bunching.
Slick surfaces, like leather or certain synthetic materials, lack friction and make it hard for the fabric to stay in place.
Improper installation, such as leaving excess fabric or not stapling securely, leads to movement and wrinkles.
To prevent this, I always choose faux leather that fits the furniture closely. I use non-slip underlays if I work with especially slick surfaces. I make sure to pull the material tight and staple it securely, starting from the center and working outward. This method helps the fabric stay smooth and in place.
Note: A snug fit and careful installation make a huge difference in the final look and feel of the piece.
Wrinkles in synthetic leather upholstery can make a project look unfinished. I have found that wrinkles often appear when I do not smooth the fabric as I go or when I rush the stapling process. Sometimes, the material develops creases if I do not let it acclimate to the room temperature before starting. I always lay the faux leather flat for at least 24 hours before use. As I attach the fabric, I smooth it with my hands and pull it evenly. I start stapling in the center of each side and work toward the corners. If I see a wrinkle, I lift the fabric and adjust it before adding more staples. Patience and attention to detail help me achieve a smooth, professional finish every time.
Tip: If a wrinkle appears after stapling, I remove a few staples, smooth the fabric again, and re-staple for a flawless result.
I have learned that skipping preparation is one of the biggest mistakes in synthetic leather upholstery. When I first started, I felt tempted to jump straight into attaching the new fabric. I wanted to see quick results. I soon realized that this shortcut caused more problems than it solved.
Preparation sets the foundation for a successful project. Without it, I often faced issues like loose fabric, uneven surfaces, or even damage to the new faux leather. I now make sure to follow a few key steps before I begin any upholstery work.
Why Prep Matters:
Cleanliness: Dust, dirt, and old glue can prevent faux leather from sticking properly. I always clean the frame and remove any debris.
Surface Inspection: I check for cracks, loose joints, or broken springs. If I skip this, the furniture might feel unstable or uncomfortable after reupholstering.
Smooth Base: Rough spots or leftover staples can poke through the new material. I sand down splinters and double-check for anything sharp.
Proper Padding: Old foam can lose its shape and support. I replace worn padding to make sure the seat feels comfortable and looks full.
Tip: I take photos during disassembly. These pictures help me remember how to put everything back together later.
When I skip prep, I often end up with wrinkles or sagging areas. Sometimes, the new fabric does not sit right because the base is uneven. I have even seen staples pop out because I missed a loose section of wood. These mistakes take more time to fix than if I had prepared properly from the start.
Here is my simple prep checklist:
Remove all old fabric and staples.
Inspect the frame for damage.
Repair any loose or broken parts.
Clean and sand the surface.
Replace or add new foam and batting.
Let the faux leather acclimate to the room.
I keep this checklist handy for every project. It keeps me organized and helps me avoid costly errors. I also find that good prep makes the rest of the process smoother and more enjoyable.
Note: Taking time to prepare does not just improve the look of the finished piece. It also extends the life of the furniture.
I encourage every beginner to respect the prep stage. Skipping it might seem like a time-saver, but it usually leads to frustration. I have learned that careful preparation is the secret to upholstery success.
When I first learned how to upholster an ottoman, I realized that this project offers a great way to practice basic upholstery skills. Ottomans have simple shapes, which makes them perfect for beginners. I always start by gathering my tools and materials before I begin. I lay out my faux leather, foam padding, batting, staple gun, and scissors. I also keep my screwdriver handy for removing legs or hardware.
Corners on an ottoman can look tricky, but I find that a few simple techniques make them neat and professional. I always approach each corner one at a time. I pull the faux leather tightly over the padding and create small pleats. These pleats help the material lay flat without bunching. I use my fingers to smooth the folds and keep them even. I staple the fabric close to the edge, making sure each pleat stays in place. If the ottoman has rounded corners, I cut small notches in the excess fabric. This step helps the material curve smoothly around the shape. I check each corner from different angles to make sure it looks clean.
Tip: Practice folding and stapling on a scrap piece of faux leather before working on the actual ottoman. This practice helps me avoid mistakes and gives me confidence.
Padding plays a big role in comfort and appearance. I always inspect the existing foam before starting. If the foam feels worn or flat, I replace it with high density foam. I cut the foam to fit the top of the ottoman, leaving a little extra around the edges. I add a layer of batting over the foam to create a soft, rounded look. The batting also helps smooth out any sharp edges. I secure the foam and batting with a few staples or spray adhesive. This step keeps everything in place when I stretch the faux leather over the top.
I lay the faux leather over the padded ottoman and smooth it with my hands. I pull the material tight and staple it underneath, starting from the center of each side and working outward. I check for wrinkles and adjust the fabric as needed. I trim any excess material after stapling. I always finish by reattaching the legs or hardware.
Note: Using quality foam and batting makes the ottoman more comfortable and helps the upholstery last longer.
I enjoy upholstering ottomans because the process teaches me valuable skills. Each project builds my confidence and improves my technique. With patience and attention to detail, anyone can achieve a professional result.
Taking care of faux leather furniture helps it last longer and keeps it looking new. I have found that regular cleaning and simple maintenance make a big difference. When I follow a routine, my faux leather pieces stay soft and free from cracks or stains.
I always start by dusting the surface with a soft, dry cloth. This step removes loose dirt and prevents scratches. For deeper cleaning, I use a damp cloth with mild soap and water. I avoid harsh chemicals because they can damage faux leather. When I need to tackle stubborn spots, I use a gentle cleanser made for synthetic materials.
Here is a table that shows the features of safe and effective cleaning products for faux leather upholstery:
|
Feature |
Description |
|---|---|
|
Cleansing agents |
Remove dirt and soil by reaching into the grain of the leather. |
|
Conditioners |
Enhance leather’s natural beauty and restore its supple feel. |
|
Blocking agents |
Protect against premature aging, spills, stains, cracking, fading, and discoloration. |
|
Fresh smell |
Provides a pleasant scent that is not overpowering. |
|
Application |
Easy to use on seats, paneling, and dash. |
|
Caution |
Test first on a small area; not for use on suede, buckskin, unfinished leather, or fabric. |
|
Compatibility |
Will not harm vinyl or rubber; avoid use where slipperiness may be hazardous. |
I always test any new product on a hidden area first. This step helps me avoid unwanted reactions. I never use abrasive sponges or brushes because they can scratch the faux leather. After cleaning, I wipe the surface dry with a clean towel.
Tip: I clean up spills right away. Quick action prevents stains from setting into the faux leather.
Regular maintenance keeps faux leather looking its best. I check my furniture every month for signs of wear or damage. If I see small cracks or fading, I apply a conditioner designed for synthetic leather. This product restores the soft feel and adds a layer of protection.
I also pay attention to the foam padding under the faux leather. If the seat feels flat or uneven, I replace the foam to keep the furniture comfortable. I make sure the foam stays dry because moisture can lead to mold or mildew. When I move my furniture, I lift it instead of dragging it. This habit protects both the faux leather and the foam from unnecessary stress.
To keep the faux surface from fading, I place my furniture away from direct sunlight. I use curtains or blinds to block harsh rays during the brightest part of the day. I avoid placing sharp objects on the furniture because they can puncture the faux leather.
Note: A little care goes a long way. With regular cleaning and maintenance, faux leather furniture can look great for years.
I have found that synthetic leather upholstery becomes simple when I break the project into clear steps. I remove old fabric, measure carefully, cut faux leather, and attach it with patience. Each project gives me a sense of accomplishment and saves money. To keep my furniture looking great, I follow these tips:
Keep furniture out of direct sunlight.
Allow new upholstery to break in for comfort.
I encourage you to start your own project and enjoy the results!

I check the frame first. If it feels sturdy and has a simple shape, I move forward. I avoid pieces with severe water damage or broken frames. Most chairs, ottomans, and benches work well for beginners.
I do not recommend regular glue for upholstery. It does not hold synthetic leather tightly enough. I always use a staple gun for a secure and long-lasting result.
If I see wrinkles, I remove a few staples near the area. I pull the fabric tight and smooth it out with my hands. Then, I re-staple the section for a clean finish.
I wipe the surface with a damp cloth and mild soap. I avoid harsh cleaners. If the stickiness remains, I use a small amount of talcum powder and buff gently.
With regular care, my faux leather projects last several years. I keep them out of direct sunlight and clean them often. Quality materials and good technique help extend the life of the upholstery.
Yes, I use a basic sewing machine with a heavy-duty needle. I set the stitch length longer than usual. I test on a scrap piece first to avoid skipped stitches.
I find synthetic leather easy to clean and resistant to spills. It does not absorb odors. I choose it for homes with pets and children because it stands up to daily use.
Business Phone : +8618150976625
E-mail : Hello@MicrofiberLeather.com
Mobile & WhatsApp : +8618150976625
Address : W6-302 Shimao Manhadun Shuanglong Road, Jinjiang Quanzhou Fujian China


© Copyright 2022 Winiw International Co.,Ltd.All Rights Reserved.
XML | Privacy Policy |